
Contents
- How DisplayFlow works
- Getting started
- Signing in and account security
- Navigating the admin
- Dashboard
- Media library
- Slideshows
- Menu boards
- Event pages
- Timetables
- Property pages
- Web pages and RSS
- Quizzes
- Overlays
- Playlists
- Schedules
- Tickers
- Screens
- Connecting an Android player
- Previewing and publishing changes
- Remote control
- Profile, features, billing, and AI credits
- Recommended operating practices
- Troubleshooting
- Platform operator appendix
- Special
- Screen Override
1. How DisplayFlow works
DisplayFlow separates content from delivery:
Media and content pages
          ↓
       Playlist
          ↓
Optional schedule and ticker
          ↓
        Screen
          ↓
Android player or browser player
- Media contains uploaded images and videos.
- Content pages are built-in designs such as menus, events, timetables, properties, web/RSS pages, quizzes, and slideshows.
- Playlists decide what plays and in what order.
- Schedules switch playlists by day and time.
- Tickers add a scrolling message over assigned screens.
- Screens represent physical displays or browser players. Each has its own six-character connection code.
The safest publishing workflow is:
- Upload or build the content.
- Preview it.
- Add it to a playlist.
- Preview the target screen.
- Assign the playlist or schedule to the screen.
- Confirm that the physical display updates and remains online.
2. Getting started
Watch the narrated Getting Started guide 1:13
For a first screen, complete these steps in order.
Step 1: Prepare content
Open Media, choose Add New Media, and upload at least one image or video. Landscape screens normally work best with 1920 × 1080 artwork; portrait screens normally work best with 1080 × 1920 artwork.
Step 2: Create a playlist
Open Playlists, select Add Playlist, enter a clear name, and keep it active. Open the playlist and use Add Item to add your uploaded content. Set the display duration for still images and content pages.
Step 3: Create a screen
Open Screens, choose Add Screen, and enter:
- a recognisable screen name;
- an optional physical location;
- an optional group, if screen groups are enabled;
- landscape or portrait orientation;
- the required offline-alert level;
- the playlist created above;
- whether the screen is active.
Step 4: Connect the player
Click the six-character code in the screen row. On the Android player, open setup and enter that code. See Connecting an Android player.
Step 5: Check playback
Return to Screens and confirm that:
- the player is Online;
- Last Seen is recent;
- the expected playlist or schedule is assigned;
- the screen preview shows the intended content.
3. Signing in and account security
Watch the narrated Sign-in and Login Security guide 1:05
Create and verify an account
When self-registration is available:
- Open the DisplayFlow registration page.
- Enter your email address and password.
- Choose the feature sections needed for the account.
- Create the account and enter the confirmation code sent to your email address.
If the code does not arrive, check spam or junk mail before requesting another code.
Sign in
Use your account email address and password on the admin login page. If email two-factor login is enabled, enter the temporary code sent to your email address.
Reset a forgotten password
- Select Forgot password on the login page.
- Enter the account email address.
- Open the time-limited reset link sent by DisplayFlow.
- Choose and confirm a new password.
For security, the reset page does not confirm whether an email address belongs to an account.
Change your password
Open Profile > Change Password. Enter the current password, the new password, and the new password again.
Enable two-factor login
Open Profile > Two-Factor Login:
- Enable Require an email code when logging in.
- Enter your current password.
- Save the setting.
Make sure the account email address is accessible before enabling this option.
Sign out
Use Log out when finishing an admin session, especially on a shared computer or mobile device.
4. Navigating the admin
The navigation is organised around three areas.
Dashboard
The dashboard summarises screen health and content counts.
Content
- Media
- Slideshows
- Menus
- Events
- Timetables
- Property
- Web
- Quizzes
- Overlays
- Special — clocks, world clocks, countdowns and weather
Optional workspace pages are hidden when their feature is disabled.
Publishing
- Playlists
- Schedules
- Tickers
- Screens
- Screen Override
- Override Setup
Account
- Profile
- Advertisers
On smaller screens, open the mobile navigation menu to reach the same pages.
5. Dashboard
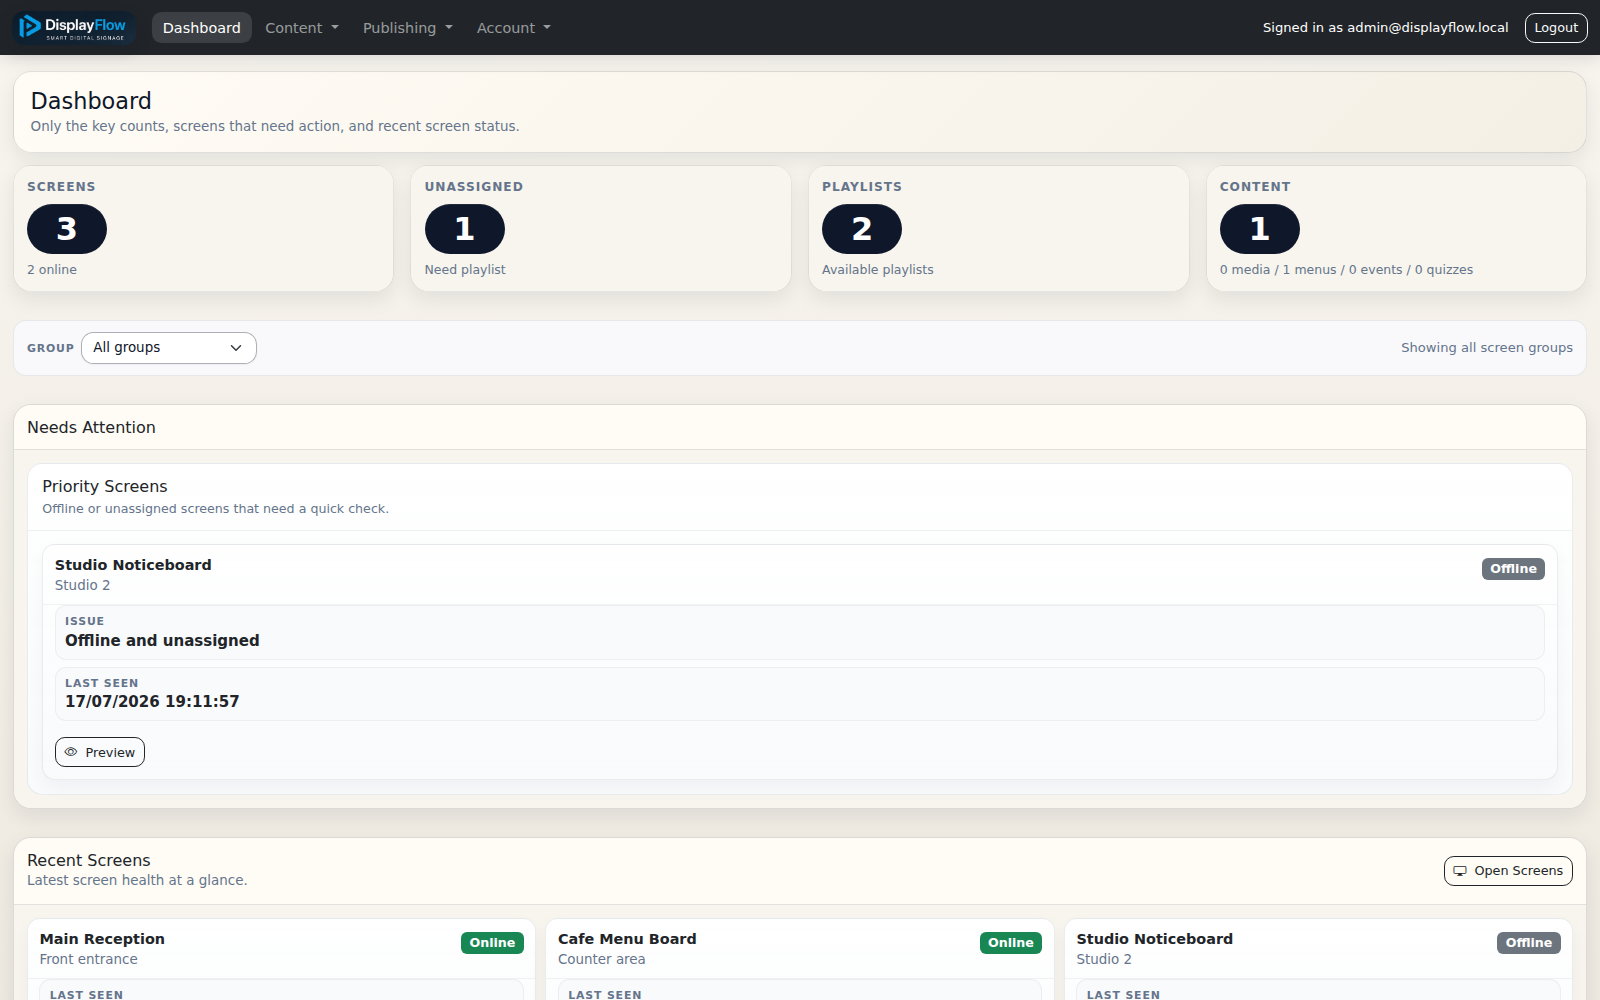
The dashboard is the best starting point for routine checks.
Summary cards
- Screens shows the total and how many are online.
- Unassigned shows screens without a direct playlist or schedule.
- Playlists shows the number available.
- Content combines key media and content-page counts.
Needs Attention
This section highlights offline or unassigned screens. For each one:
- Check Last Seen.
- Open Preview to confirm the expected content.
- Open Screens to check its assignment and active state.
- If necessary, inspect the physical player, network, or power connection.
Recent Screens
This section provides a quick view of recent player health. If groups are enabled, use the group filter to narrow the view to a site, department, or customer-defined group.
6. Media library
Watch the narrated Uploading Media guide 1:00
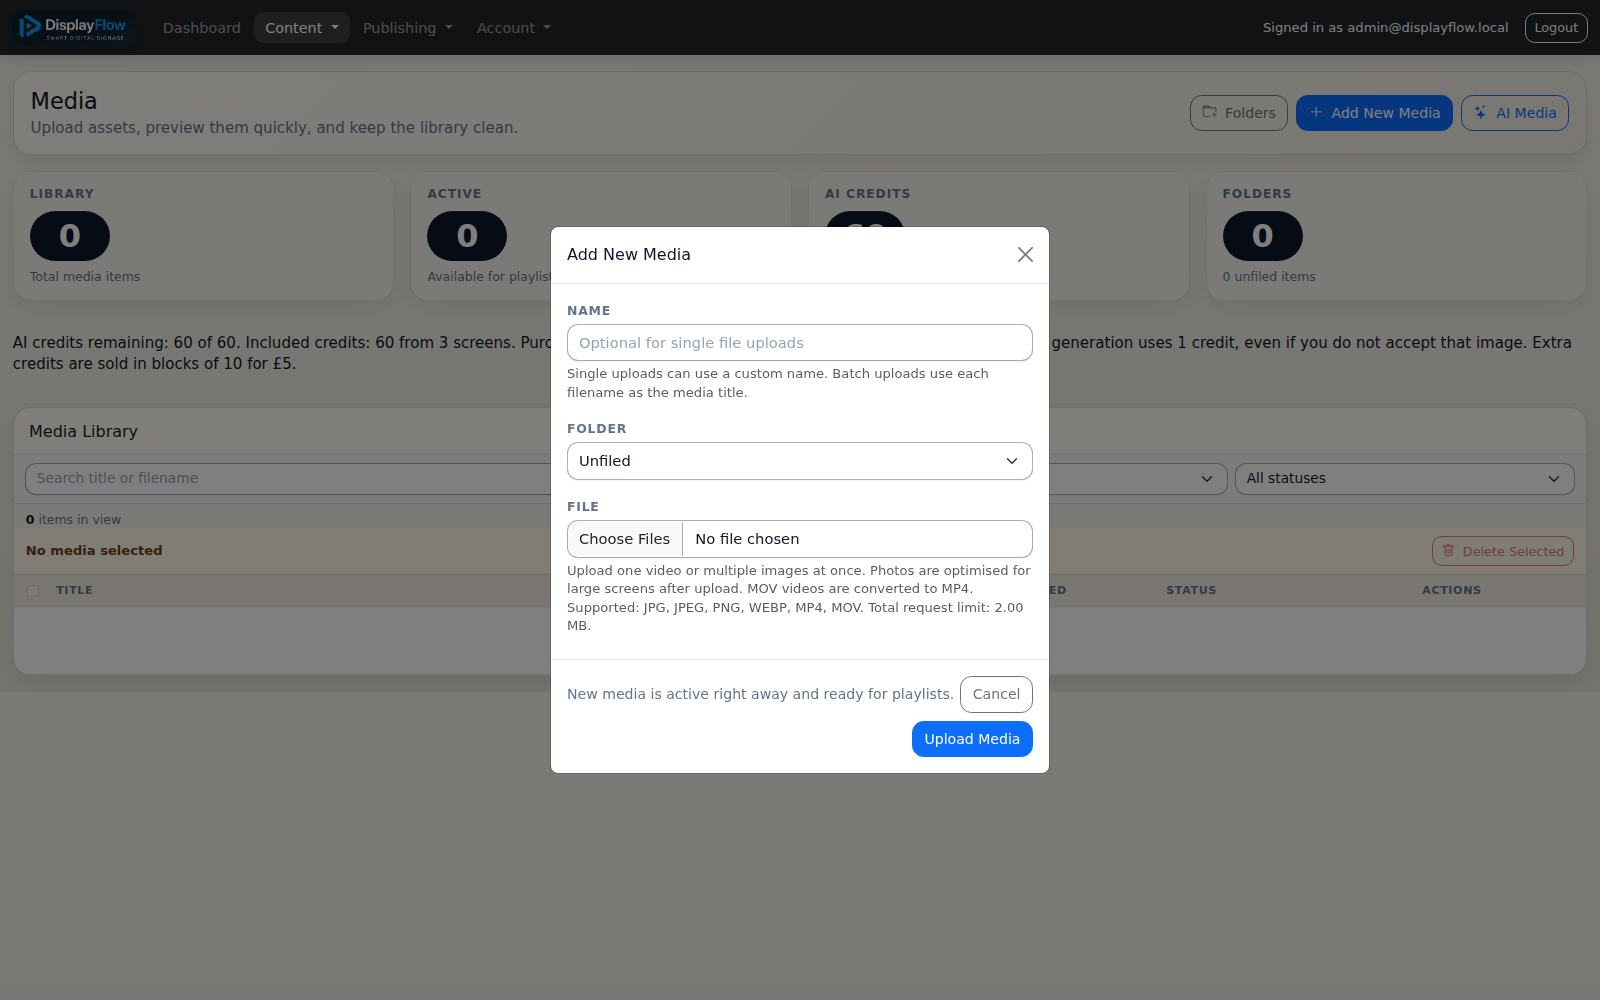
The media library stores images and videos used directly in playlists and by content builders.
Supported uploads
The upload form accepts:
- JPG and JPEG;
- PNG;
- WEBP;
- MP4;
- MOV;
- ZIP archives containing any of the supported media formats.
Uploaded photos are optimised for large-screen use. MOV files are converted to MP4 when server conversion support is available. ZIP upload requires the PHP ZIP extension; unsupported and hidden archive entries are skipped. The upload form displays the current total request-size limit.
Upload media
- Open Media.
- Select Add New Media.
- Choose Files to upload from your device, or URL to import a directly accessible public image or video link into the media library.
- Enter a name for a single file or URL, or allow batch uploads to use their filenames.
- Choose a folder or leave the item Unfiled.
- For Files, select individual files or a ZIP archive. On phones and tablets, the file picker can open Photos or Files. For URL, paste the direct public HTTP or HTTPS link.
- Upload or import the media.
After uploading, preview each important item before publishing it.
Search and filter
Use the media-library controls to filter by:
- search text;
- folder;
- image or video;
- active or inactive;
- used or unused;
- missing file.
Media folders
Use Media Folders to create and rename folders. Folders are especially useful for slideshows and for keeping venue, campaign, or customer assets separate.
When creating a folder, you can also create an active playlist with the same name, an active slideshow linked to the folder, or both. The slideshow option is available when the Slideshows feature is enabled.
Deleting a folder normally moves its media to Unfiled. The folder-and-media deletion option removes only unused media; items referenced elsewhere are retained.
Activate or deactivate media
An inactive item remains in the library but is unavailable for normal playback selection. Use this for temporary withdrawal without deleting the record.
Update media
Use Update Media to change its title, folder, active state, or source file. Replacing the source of an existing media item retains its references in playlists and content pages.
Crop and edit images
The image editor supports:
- original, 1920 × 1080, 1080 × 1920, square, or custom output sizes;
- crop, fit, or stretch sizing;
- background colour for fitted images;
- zoom and rotation;
- brightness, contrast, and colour adjustment;
- saving as a new copy or replacing the existing item.
Choose Create a new edited copy when you may need the original again. Choose Replace the current image only when every use of that media item should change.
Delete media
DisplayFlow prevents deletion while media is referenced by a playlist or supported content page. Remove those references first, then delete the item.
Missing files
A missing-file warning means the database record exists but the uploaded file is absent. Use Update Media to replace the file before using that item.
AI Media
When enabled, AI Media creates an image from a written request and chosen style/orientation options.
- Write a detailed request.
- Choose the available design options.
- Optionally choose an existing library image as a reference and select whether it should guide the colour palette, visual style, composition, or subject/product.
- Generate the image.
- Check all generated wording, names, dates, prices, branding, and referenced visual details.
- Accept it to add it to the media library, or generate another result.
The reference is guidance rather than an exact template. Each successful generation can consume an AI credit even if the result is not accepted. AI output can contain inaccurate text or visual details, so never publish it without review.
7. Slideshows
Watch the narrated Creating a Slideshow guide 0:59
A slideshow links a named slideshow item to a media folder containing active images.
Create a slideshow
- Create a folder under Media > Media Folders. You can create the matching active slideshow at the same time, or complete the remaining slideshow steps manually.
- Upload the required images into that folder.
- Open Slideshows.
- Select Create Slideshow.
- Enter a unique name, choose the folder, and keep it active.
When adding the slideshow to a playlist, choose:
- Next slideshow image to cycle through the folder; or
- Random slideshow image to choose images randomly.
Adding or removing active images in the linked media folder changes the slideshow contents. A slideshow cannot be deleted while it is used by a playlist.
8. Menu boards
Watch the narrated Menu Board guide 0:51
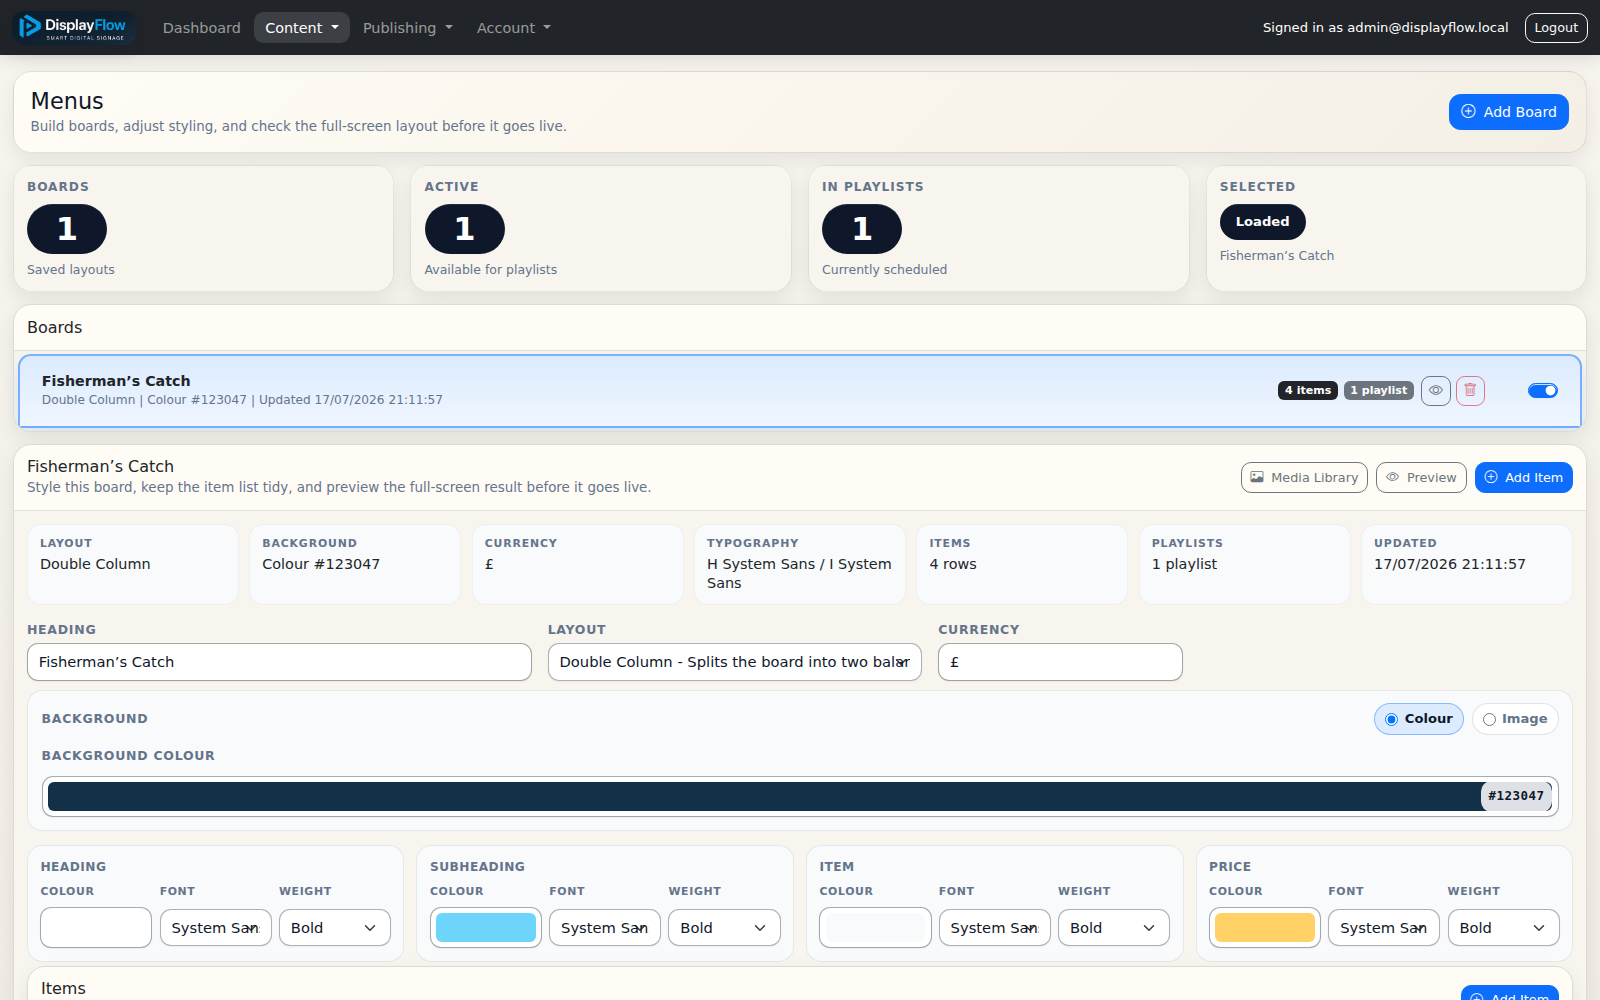
Menu boards create formatted, playlist-ready menus without uploading finished artwork.
Create a board
- Open Menus.
- Select Add Board.
- Enter the heading.
- Choose a layout and currency symbol.
- Keep the board active and create it.
Add menu items
Open the board and add each item with:
- section;
- item title;
- description;
- price;
- optional second option and option price;
- optional item photo from the media library.
The board adds its configured currency symbol to price values automatically. Use sections consistently to keep the layout clear.
Style and preview
Choose Auto Fit to let DisplayFlow select a layout from the item count, named sections, linked-photo coverage, and current landscape or portrait screen shape. New boards use Auto Fit by default. Manual choices include single, double, and three-column menus, Photo Cards, Featured Item, Section Grid, and the dense Takeaway Board. Photo Cards gives each photographed item a large image-led card; Featured Item promotes one photographed item while retaining linked photos in the remaining list. You can optionally apply a quick design theme. Themes update the board colours and typography and can still be customised with the individual controls. The existing board data remains editable after applying a theme.
When a board is selected, the board list collapses to that row. Use Show other boards to reveal the remaining boards and Hide other boards to collapse the list again.
The live preview updates while you edit. It uses the full board height and measures and enlarges menu typography until it reaches the maximum size that fits the available width and height, while retaining the selected column layout and column spacing. Item names and prices receive priority over the board heading and supporting descriptions. The fit check keeps the final menu row inside the compact padded screen area, and item photos remain visible at a smaller size when a crowded board needs a denser layout. Switch the preview between landscape and portrait to check both screen shapes, and use Open full-screen preview for the final review. The full-screen preview is rendered only after its modal reaches its final dimensions, preventing an initial large-font frame from jumping to a smaller fitted size. The layout check warns about excessive items, long text, low colour contrast, background-image readability, and content that has been reduced too far to fit.
Each item has its own up/down controls. The first item in a named section also shows blue section controls, which move that whole section while preserving the order of its items.
AI menu screen
When AI media is enabled, Create AI Menu Screen generates a flat image based on the menu board. Choose landscape or portrait, review every item and price, then add the accepted result to the media library.
The generated image is separate from the live menu board. Later edits to the board do not automatically change that image.
Delete a board
A board used by a playlist cannot be deleted. Remove it from all playlists first.
9. Event pages
Watch the narrated Creating an Event Page guide 1:05
Event pages display a list of events with optional times or dates.
Create an event page
- Open Events.
- Select Add Event Page.
- Enter a title.
- Choose a layout: Time then Event, Event then Time, Time above Event, Event above Time, Two-column Cards, or Timeline.
- Keep the page active and create it.
Add lines
Open the page and select Add Line. Enter the event text and optional display label, location, start/end, and repeat settings. A non-repeating event with no end remains visible for 24 hours after its start; one with an end hides after that end. Repeating events remain visible through their Repeat until value. Add, edit, remove, and reorder lines as required.
Import and organise
Use Import to append up to 500 events from a CSV file, an iCal (.ics) file, or a public iCal URL supplied by Google Calendar, Outlook, or another calendar provider. CSV headers are title,time,location,start,end,repeat,repeat_until. Reimported iCal events with the same UID are skipped.
Search and status filters help with larger page libraries. Select multiple pages for bulk activation/deactivation; pages currently used by playlists are not deactivated. Duplicate creates an inactive draft containing the source styling and entries.
Style and preview
Choose from six responsive layouts and 12 built-in design templates: Midnight Blue, Gallery Light, Festival, Minimal Mono, Ocean Blue, Forest Green, Sunset, Corporate Light, Chalkboard, Rose Evening, High Contrast, and Warm Paper. You can then customise the background, detail-box colour and typography. The layout check warns about excessive rows, long labels, and low colour contrast. Preview the full-screen page before adding it to a playlist.
AI event screen
When enabled, the AI action produces a landscape or portrait image from the event-page title and lines. Check all names, dates, times, and wording before accepting it into the media library.
10. Timetables
Watch the narrated Creating a Timetable guide 1:01
Timetables support daily, weekly, compact, and room-based information screens.
Create a timetable
- Open Timetables.
- Select Add Timetable.
- Enter a title and optional subtitle.
- Choose a template.
- Configure styling and background options.
- Add timetable rows and save.
Rows can include day, time, activity or subject, and room/location information according to the chosen template. Use the duplicate-row action for repeated entries.
Manage timetables
- Use Preview to check the finished layout.
- Use Duplicate to create a starting copy for another day, room, or site.
- Deactivate a timetable to remove it from normal selection without deleting it.
- Remove it from playlists before deletion.
11. Property pages
Watch the narrated Creating a Property Page guide 1:00
Property pages combine multiple media-library images with listing details.
Before creating a property
Upload the property photographs under Media. Only suitable active media-library images can be selected.
Create a property
- Open Property.
- Select Add Property.
- Enter only the address, cost, and description required for the listing. These fields are optional and empty values are not displayed.
- Choose For Sale, To Let, To Hire, or Not shown for the listing status. Choose Residential, Commercial, or Not shown for the property type.
- Choose a layout template. Available layouts include picture-left and picture-right designs, picture-above designs, overlays, a gallery grid, and heading-first variations that place each detail heading above its value.
- Select Add Detail, choose a heading, enter or select its content, and add only the facts that should appear.
- Select at least one image. Images remain required so a property cannot create an entirely blank screen.
- Keep the property active and save it.
The detail headings are grouped into residential, commercial, room hire, and general choices. Room hire details include capacity, hire rate and period, room dimensions, seating layout, catering, refreshments, licensed bar, AV equipment, projector, sound system, stage, Wi-Fi, kitchen access, setup time, booking deposit, and cancellation terms. Empty or zero-value details are not displayed.
Use the folder filter to find images quickly. Preview the result and verify that only explicitly added details appear.
12. Web pages and RSS
Watch the narrated Web Pages and RSS guide 0:57
The Web area stores named web or RSS sources for playlists.
Add a web page
- Open Web.
- Select Add Web Page.
- Enter a name.
- Choose Web page.
- Enter the full HTTPS URL.
- Keep the item active and save it.
Use Preview to check whether the site permits embedding. Some websites block display inside another application, require cookies or login, or are not designed for TV navigation.
Add RSS headlines
- Create a new Web item.
- Choose RSS headlines.
- Enter the feed URL.
- Choose the number of headlines and RSS layout.
- Save and preview it.
RSS playback depends on the remote feed remaining reachable and valid. A feed owner can change its format without notice.
YouTube and other hosted content
Where supported by the player, hosted pages or video services still depend on the provider allowing embedded playback and on the screen having a working internet connection.
13. Quizzes
Watch the narrated Quizzes and Live Quiz guide 0:56
Quizzes can use customer-created questions and shared category banks.
Category controls
The category list shows availability, question counts, and colour themes. Activate only the categories you want random quiz selection to use.
Use Category Theme to set:
- background colour;
- question colour;
- answer colour;
- answer-box colour;
- accent colour;
- correct-answer colour.
Theme changes apply to every quiz in that category.
Create or edit a question
Enter:
- category;
- question;
- optional active image or video from Media;
- answers A, B, C, and D;
- the correct answer;
- countdown duration;
- answer-reveal duration;
- active state.
Preview attached media and proofread the correct-answer selection before publishing.
Add quizzes to a playlist
You can add:
- a fixed quiz question; or
- a Random quiz question marker, optionally restricted to a category.
Random markers let the player choose from the active eligible bank while avoiding an entirely fixed sequence.
14. Overlays
Watch the narrated Creating and Assigning Overlays guide 1:02
Create and style an overlay
Open Content > Overlays and choose Add Overlay. Configure:
- Name — the reusable label shown in playlist and screen selectors;
- Type — Time, Date, Date & Time, QR Code, Text, or Image / Logo;
- Content — required for Text and QR Code overlays;
- Image / Logo — required for image overlays and selected from active images in Media;
- Position — Top Left, Top Centre, Top Right, Middle Left, Centre, Middle Right, Bottom Left, Bottom Centre, or Bottom Right;
- Text Colour and Background Colour;
- Size — from 50% to 200%;
- Active — only active overlays are available for new assignments and player output.
Time and date overlays use the screen timezone. QR codes are generated by the player from the saved content. Use a compact size and test the viewing distance before publishing QR codes or detailed text.
Put an overlay on one playlist item
Open the playlist item editor and choose an overlay from Overlay (Optional). Save the item, then use Preview item with overlay to check its position, colours, size, text, QR code, or image before publishing. Choose No overlay to remove the item-level assignment.
An item-level overlay appears only while that item is playing. Editing the reusable overlay updates every item and screen that uses it.
Put an overlay on an entire screen
Open Screens and find the required screen. In the Assignment column, use the second selector labelled Screen overlay beneath the playlist or schedule selector. Choose the reusable overlay you want, then wait for the row's saved confirmation. Choose No screen overlay to remove it.
A screen overlay remains active across direct, scheduled, and fallback playlists. If a playing playlist item has its own overlay, the item overlay temporarily takes priority; the screen overlay returns on the next item without an item-level overlay. Use the screen row's Preview control to verify the final position, size, colours, image or text, and landscape or portrait orientation.
15. Playlists
Watch the narrated Playlists and Schedules guide 1:00
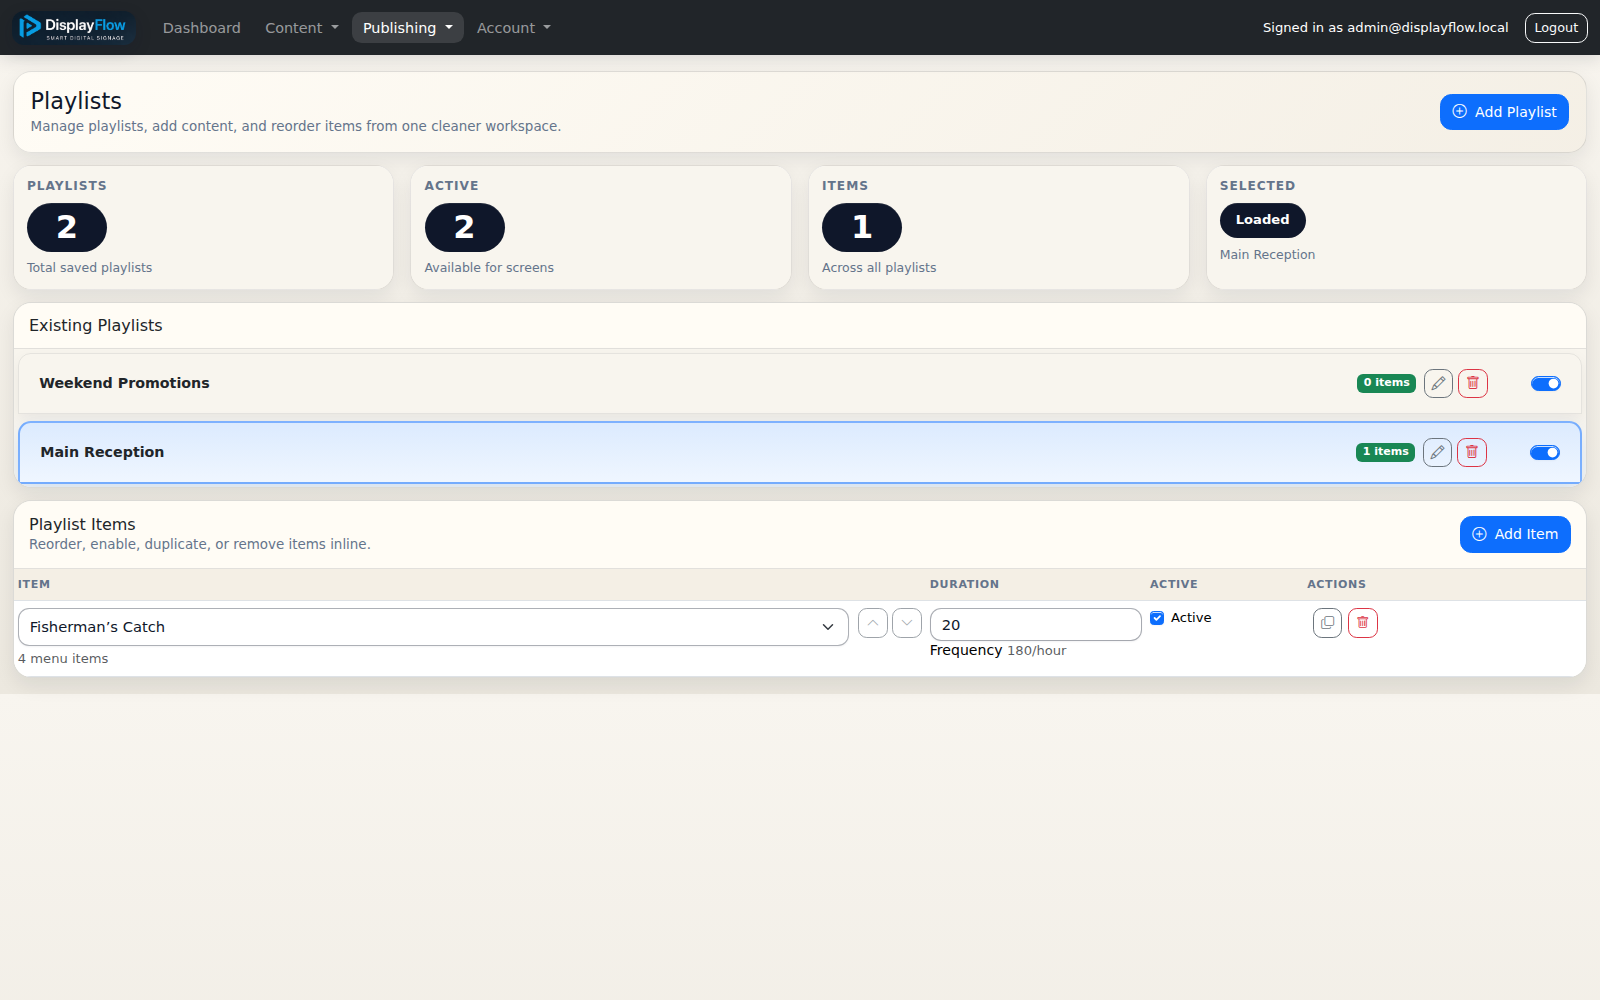
A playlist is an ordered list of content shown by a screen.
Create a playlist
- Open Playlists.
- Select Add Playlist.
- Enter a descriptive name.
- Keep it active and create it.
Add items
Open the playlist and choose Add Item To Playlist. Depending on enabled features and available content, items can include:
- images or videos;
- slideshows;
- menu boards;
- event pages;
- timetables;
- properties;
- web pages or RSS;
- fixed quiz questions;
- random quiz markers.
Set Display Duration for still images and generated content pages. Video duration is normally driven by the video itself. The minimum configured item duration is one second.
Slideshow mode
For slideshow items, select Next slideshow image or Random slideshow image.
Reorder and edit
Use the item controls to change order, duration, active state, or selected source. Duplicate an item when you need a similar entry, and delete items no longer required.
Inactive playlist items remain in the playlist but do not play.
Playlist changes and screens
Screens assigned to the playlist receive changes through normal player refresh/heartbeat activity. Use the screen reload control when an immediate refresh is needed.
Delete a playlist
Before deleting a playlist, check whether screens, schedules, or other delivery settings depend on it. Reassign those screens and rules first.
16. Schedules
Watch the narrated Playlists and Schedules guide 1:00
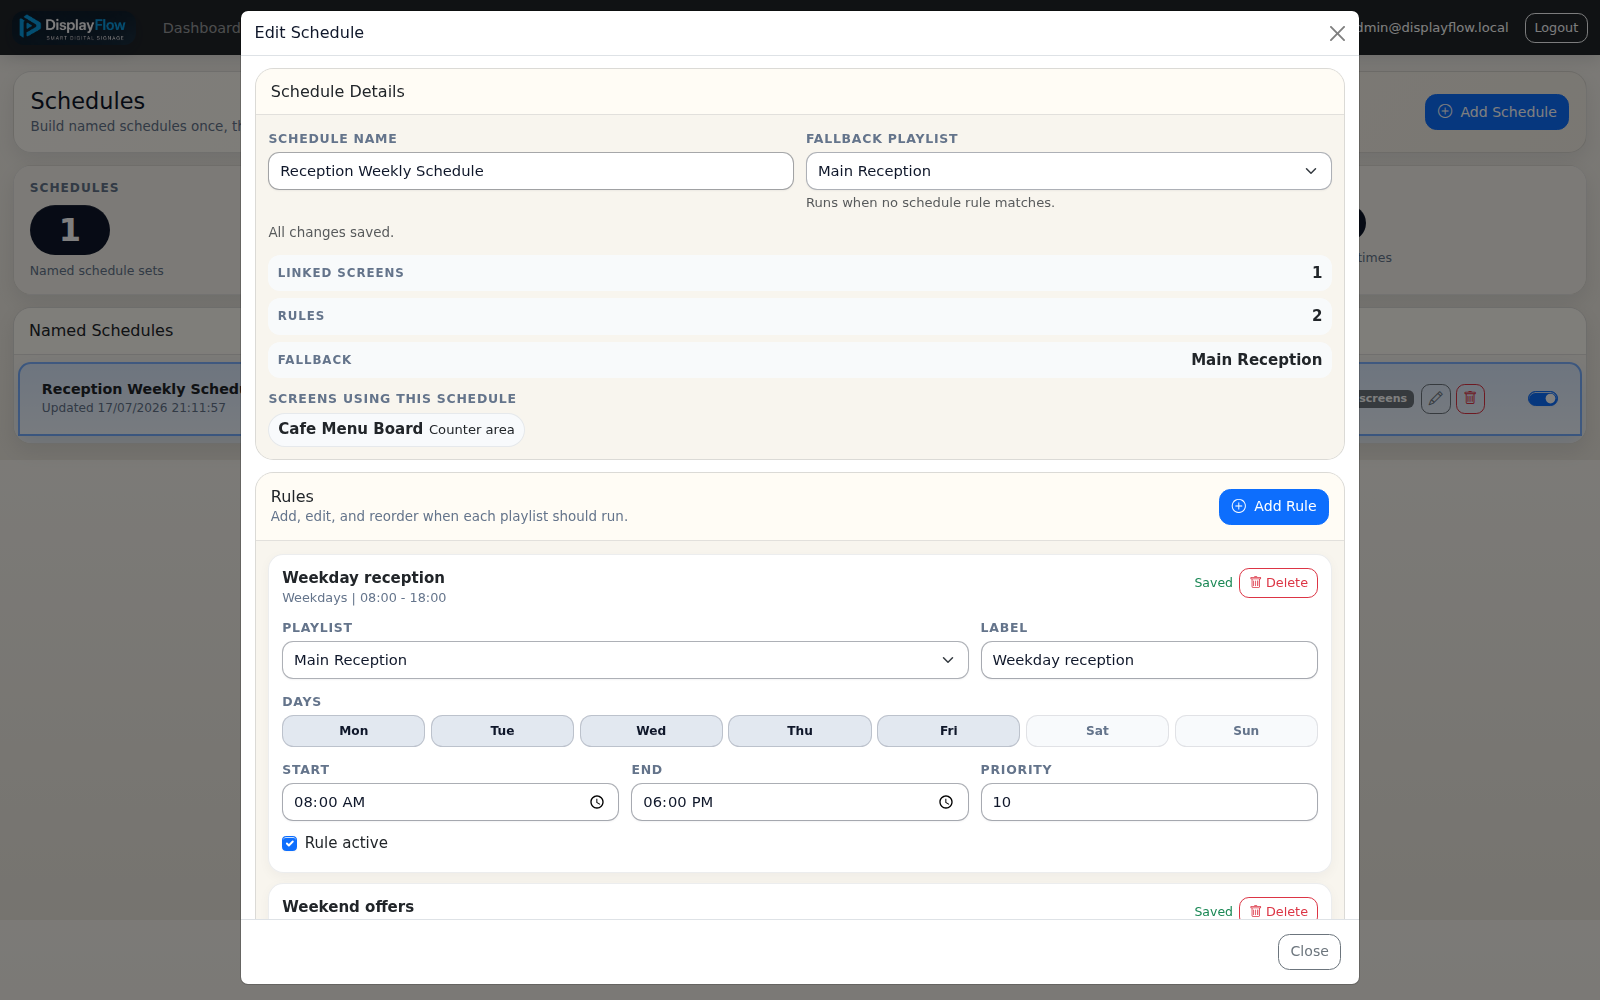
A schedule selects playlists by day and time. Screens using a schedule can fall back to another playlist when no rule matches.
Create a schedule
- Open Schedules.
- Select Add Schedule.
- Enter a name and create it.
- Open the schedule editor.
- Choose an optional Fallback Playlist.
The fallback runs when no active rule matches. If no rule or fallback playlist matches, the schedule does not resolve to playable content.
Add a rule
For each rule, choose:
- playlist;
- optional label, such as Breakfast or Evening;
- days of the week;
- start time;
- end time;
- priority;
- active state.
Times use the application timezone shown in the editor. If the end time is earlier than the start time, the rule runs overnight.
Priority and overlapping rules
Priority controls which rule wins when more than one active rule matches. Use a deliberate priority scheme and preview the result around rule boundaries.
Assign a schedule
Schedules are linked from Screens > Assignment. The schedule editor shows the screens currently using it.
Edit and delete
Schedule details and rules save automatically where indicated. Before deleting a schedule, note its linked screens and give them a new assignment; otherwise they may become unassigned.
17. Tickers
Watch the narrated Tickers guide 0:56
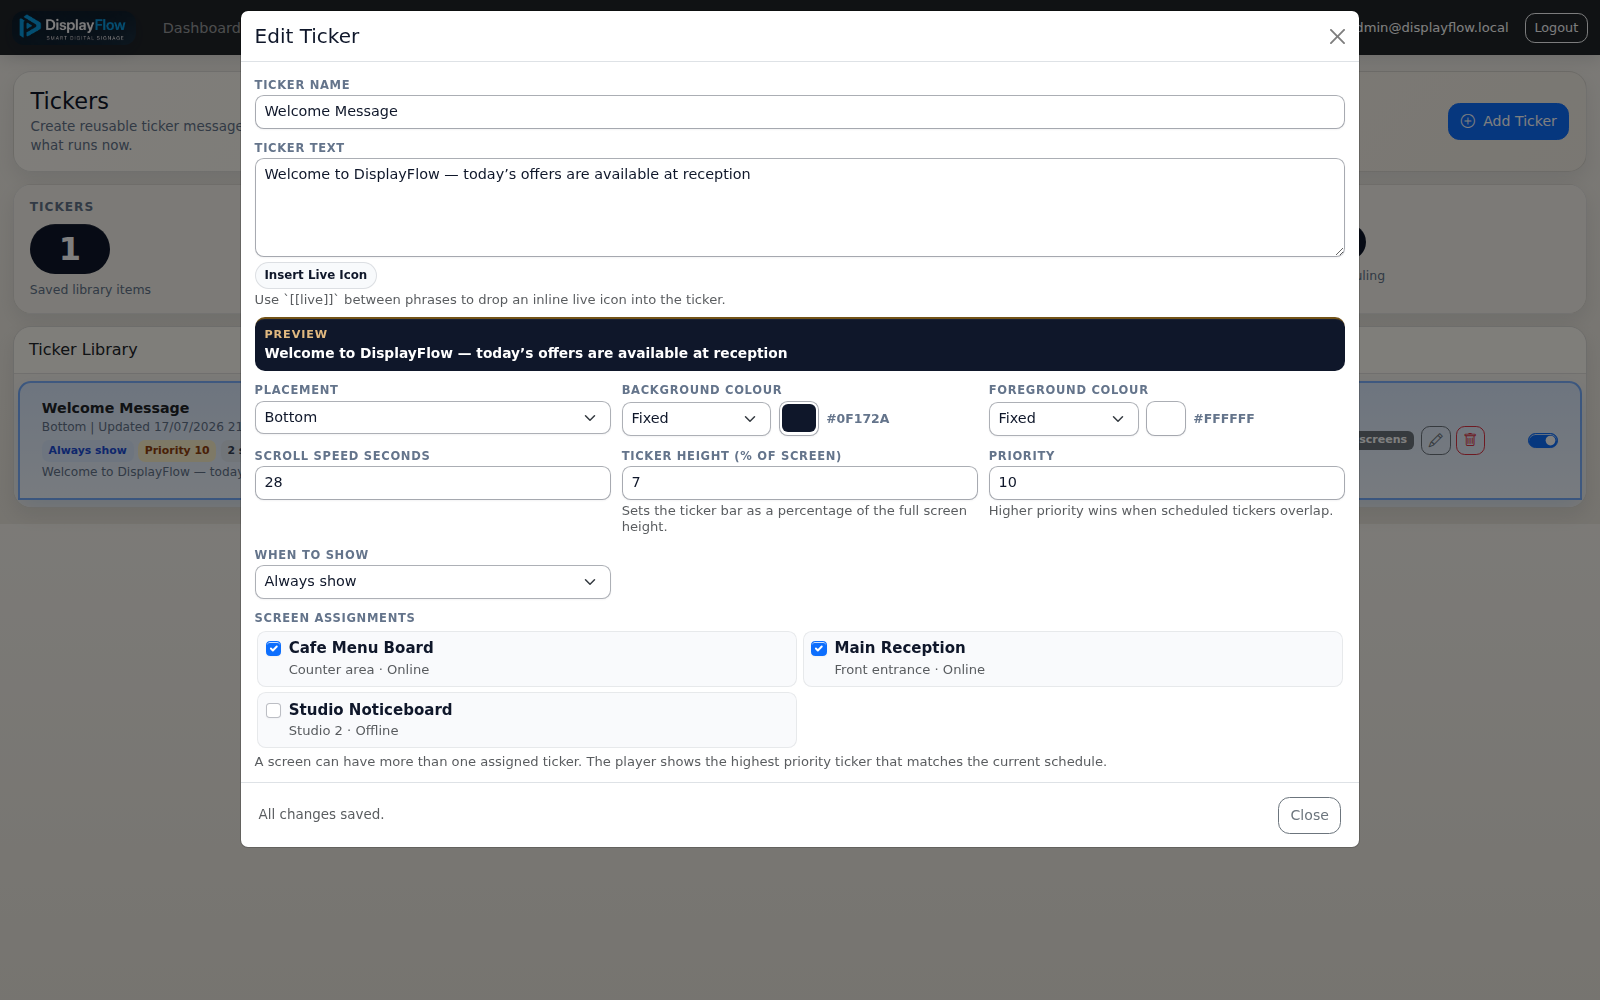
Tickers display scrolling text over assigned screens.
Create a ticker
Open Tickers, choose Add Ticker, and configure:
- internal ticker name;
- ticker message;
- optional Live, Offer, New, Alert, or Info badges;
- optional screen-local clock/date and dot, star, or arrow separators;
- top, bottom, or switching position;
- fixed or random background colour;
- fixed or random text colour;
- scroll speed in seconds;
- switching interval when using the switching position;
- height as a percentage of the screen;
- priority;
- always-on or scheduled display;
- daily start and end times;
- optional overall start and end dates;
- days of the week;
- screen assignments;
- active state.
Multiple tickers
Priority determines which eligible ticker is selected when multiple active ticker schedules overlap. Keep priorities intentional and avoid identical overlapping rules unless that is required.
Assignments
Ticker-to-screen assignments are managed in the ticker editor. The Screens page shows a summary and provides a shortcut back to ticker management.
Preview and autosave
Use the live preview to check contrast, message length, inserted badges, height, and colour choices. Existing tickers save automatically, and closing the editor waits for any pending change to finish.
18. Screens
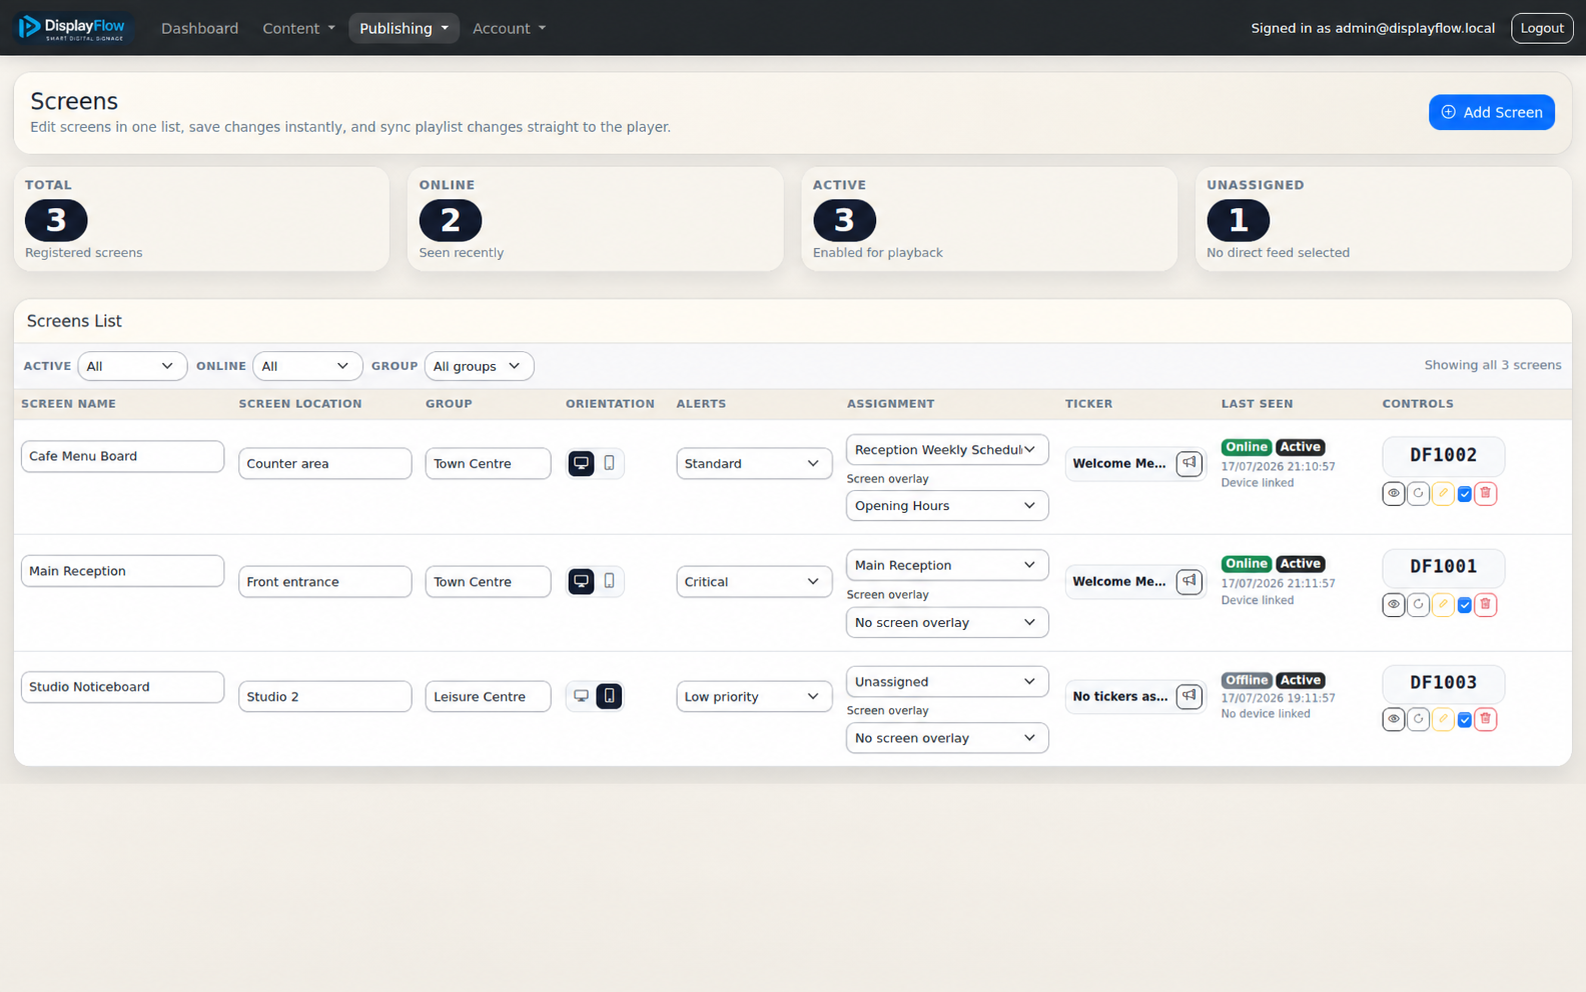
A screen record controls assignment, orientation, alerts, connection, and player actions.
Add a screen
Select Add Screen and configure:
- Screen Name — a unique operational label;
- Screen Location — the physical position or venue;
- Group — optional grouping when enabled;
- Orientation — landscape or portrait;
- Offline Alerts;
- Assignment — unassigned, direct playlist, or named schedule;
- Screen Overlay — optional reusable overlay shown across every playlist on this screen;
- Screen active.
Your account cannot create more screens than its current screen tier permits.
Screen list fields
Most screen-row changes save automatically:
- name;
- location;
- group;
- orientation;
- offline-alert level;
- playlist or schedule assignment;
- screen overlay assignment;
- active state.
Wait for the save indicator before leaving the page.
Screen-level overlays
Choose an overlay in the Screen overlay selector beneath the screen's playlist or schedule assignment. It remains visible as the screen moves between direct, scheduled, and fallback playlists. Choose No screen overlay to remove it.
If a playing playlist item has its own overlay, the item overlay takes priority for that item. When the next item has no item-level overlay, the screen overlay appears again. Use Preview on the screen row to verify the final combination and orientation.
Online and active are different
- Active means DisplayFlow permits the screen to receive normal content.
- Online means the player has contacted DisplayFlow recently.
An active screen can be offline because of power, device, Wi-Fi, or internet problems. An inactive screen should not be treated as healthy merely because it connected recently.
Offline-alert levels
- Critical — alert after approximately 5 minutes offline.
- Standard — alert after approximately 10 minutes offline.
- Low priority — alert after approximately 30 minutes offline.
- No alerts — do not send offline alerts for this screen.
Alert delivery also depends on server email and monitoring being configured.
Controls
- Click the screen code to open connection instructions.
- Preview opens a browser preview of the assigned output.
- Force player reload requests a reload on the next player contact.
- Release linked device removes the current device binding so another player can pair.
- The Active switch enables or disables the screen.
- Delete permanently removes the screen record after confirmation.
Screen groups
When available, groups can represent locations, floors, departments, brands, or operational teams. Consistent group names make Dashboard and Screens filters more useful.
Advertiser management
Watch the narrated Managing Advertisers guide 0:57
Use Advertisers under Account to record businesses paying to advertise. Payment terms separate the rate period from the payable term, so you can record arrangements such as £10 per week, payable quarterly. DisplayFlow calculates that example as £130.00 due per quarter, using standard annual factors of 52 weeks, 12 months, or four quarters. Payable terms include weekly, monthly, quarterly, annual, one-off, and other; other terms do not have an automatic total. For standard terms, DisplayFlow also calculates the term end date from the start date automatically. Each record stores contact details, payment status, the next-payment date, an invoice reference, and notes.
Advertiser records are private to your account. They are administrative records only: adding or changing one does not alter screen playback, playlists, or your DisplayFlow subscription.
Set your originating Company name under Account > Profile before sending advertiser emails. Use Send Agreement to email the advertiser a clearly spaced, company-branded summary of their rate, payable term, dates, and a fresh private graphic upload link; internal notes are not included. Use Send Upload Link when you only need to resend a link. Each link accepts one JPG, PNG, or WebP graphic for seven days. After a successful upload, the link stops working and the image appears directly in your Media Library. The upload page identifies the originating company but does not expose your screens, existing media, account details, or admin controls.
19. Connecting an Android player
Watch the narrated Connecting a Screen guide 1:00
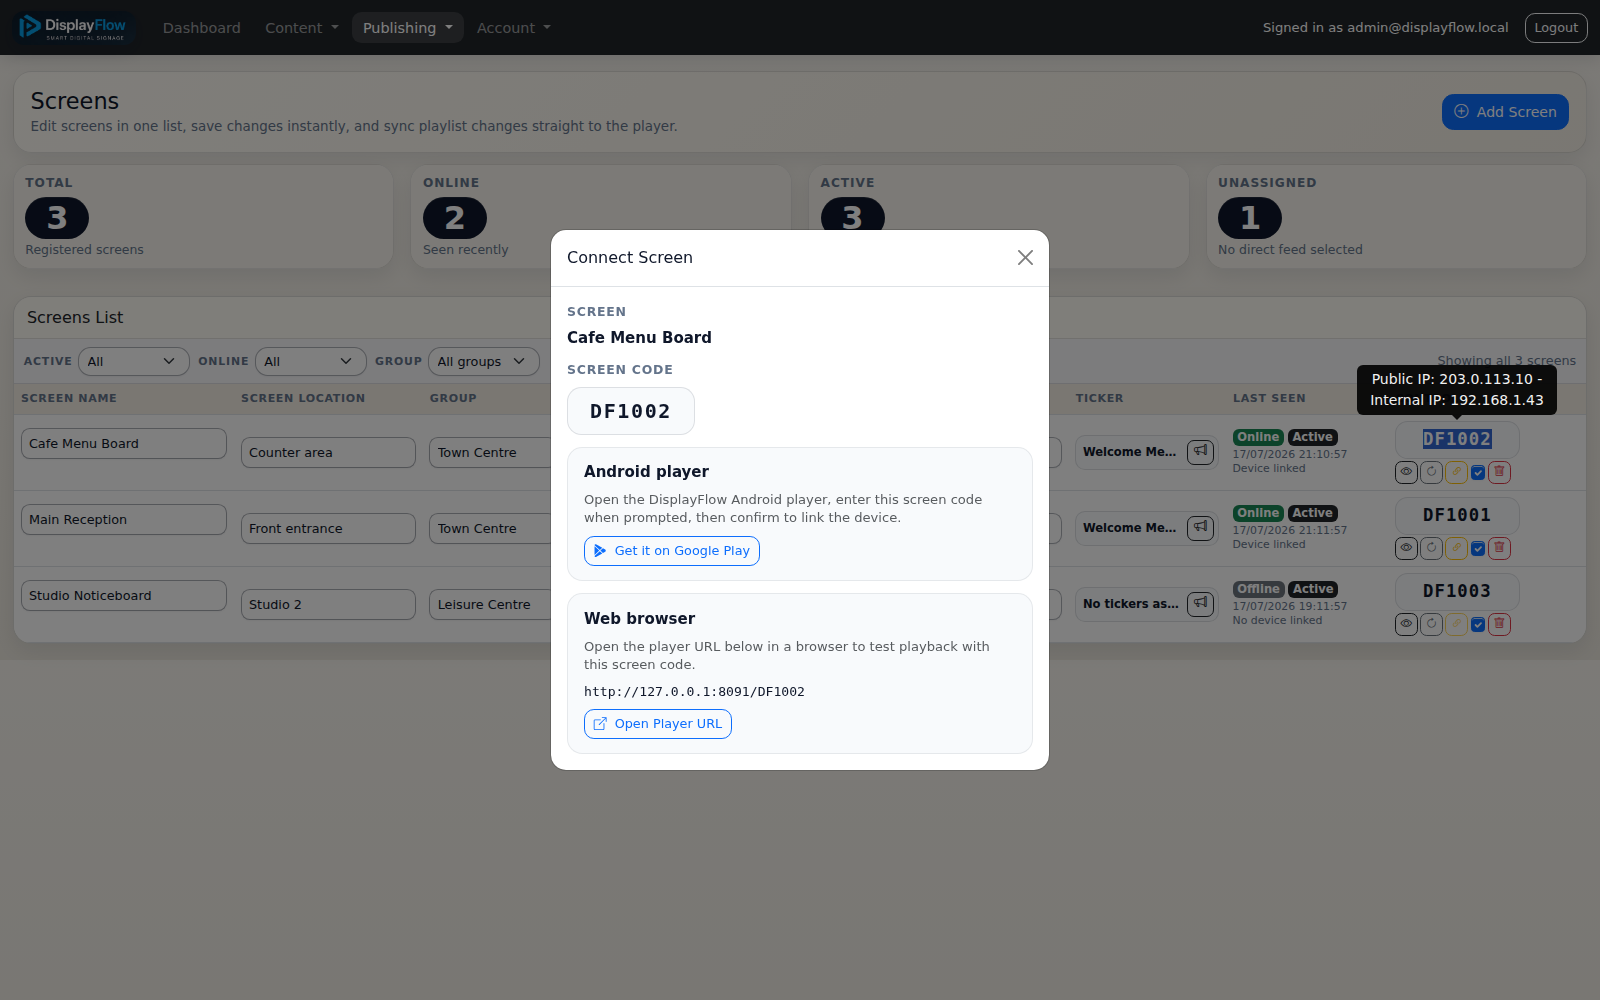
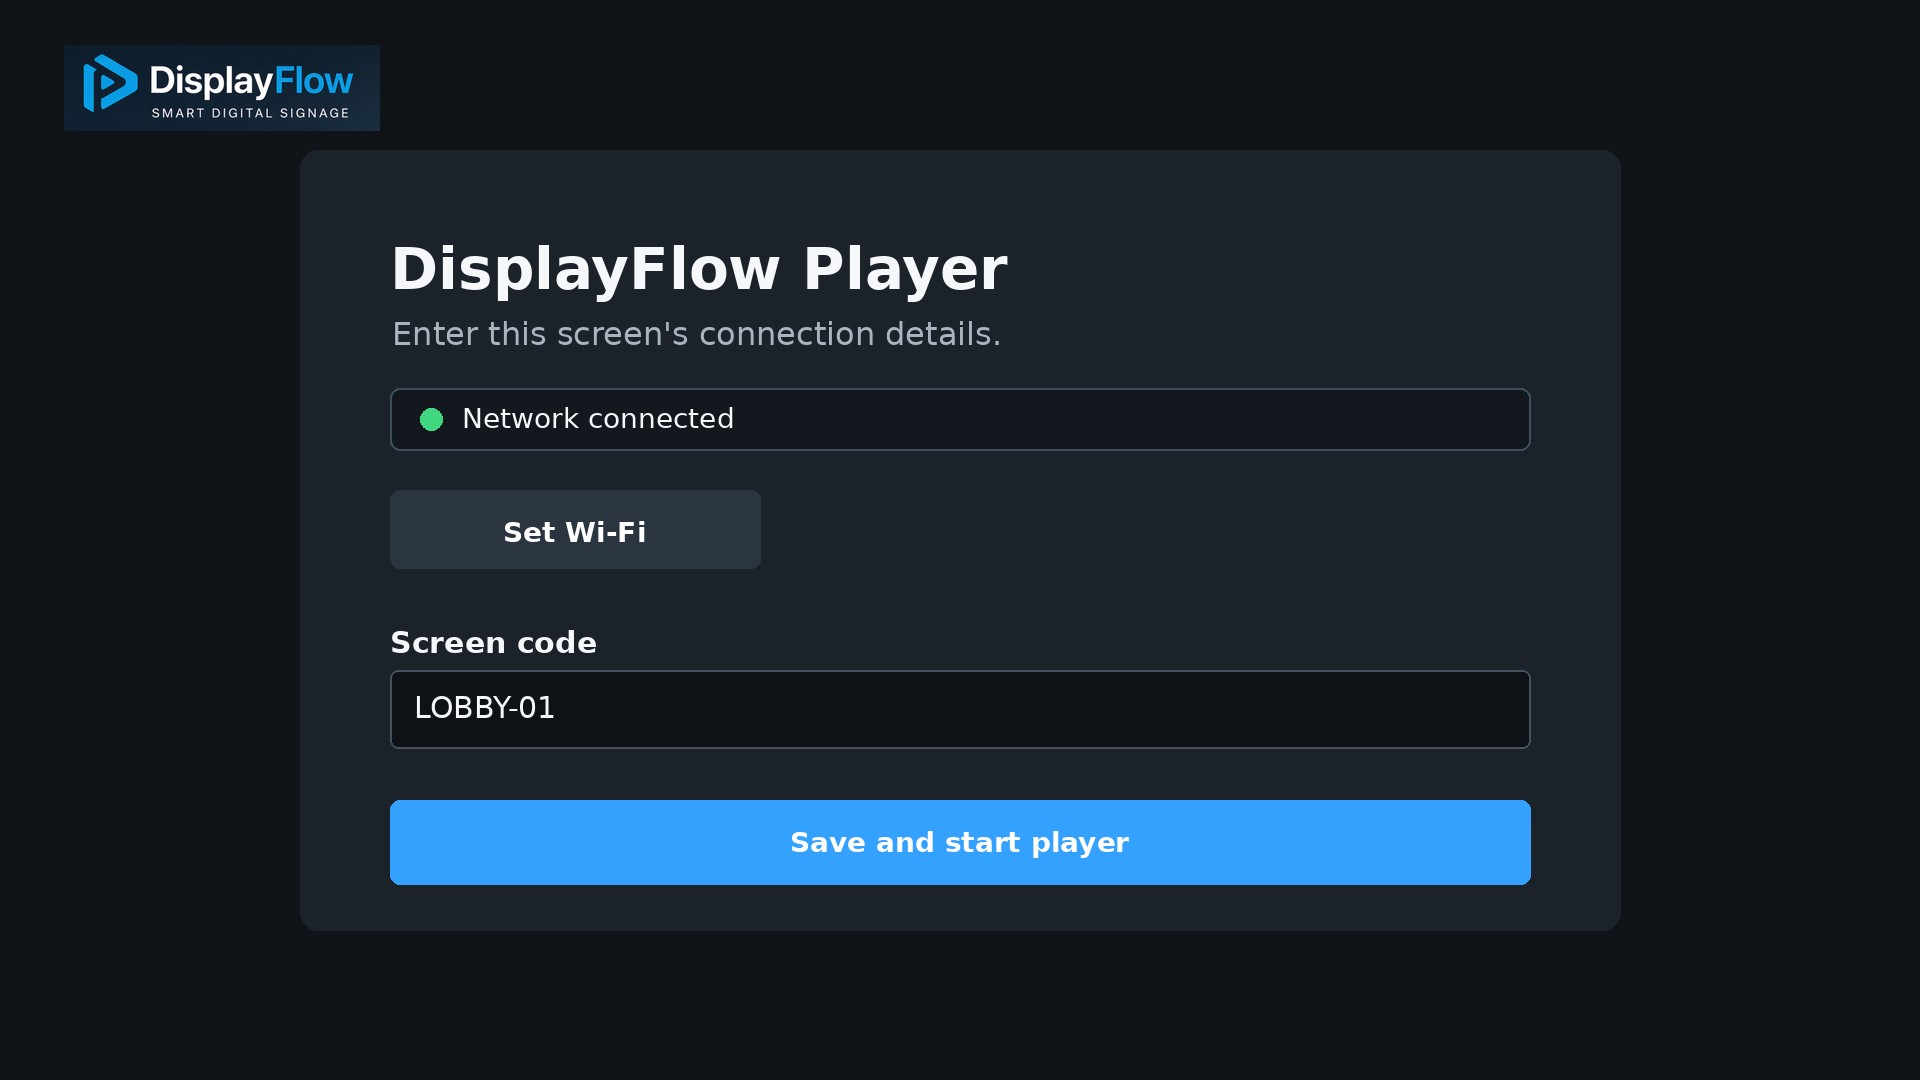
Connect a new player
- Create the screen in the admin.
- Click its six-character code to open Connect Screen.
- Install and open the DisplayFlow Android player.
- Connect the Android device to the venue network using Set Wi-Fi if required.
- Enter the screen code exactly as shown.
- Choose Save and start player.
- Wait for assigned content to load.
- Confirm in Screens that the screen is online and device linked.
Browser test player
The Connect Screen window also shows a player URL. Open it in a browser to test the screen assignment. Do not post this URL publicly because it contains or represents access to the screen connection.
Move a code to another device
If a screen is already device linked:
- Open Screens.
- Select Release linked device for that screen.
- Open setup on the replacement player.
- Enter the existing screen code.
- Confirm the new device becomes linked and online.
Do not release a device during normal playback unless you intend to pair another device.
20. Previewing and publishing changes
Watch the narrated Previewing and Publishing guide 1:03
Content preview
Use the preview action inside Menus, Events, Timetables, Properties, Web/RSS, Media, or other builders before adding content to a playlist.
Screen preview
Screen preview is the most useful final check because it uses the screen's assignment and orientation. It does not prove that the physical device is online.
Use the Preview speed selector to review a screen or playlist at 1×, 1.5×, 2×, or 4× speed. The faster settings shorten timed content and speed up uploaded video playback in the preview only; they do not change the saved playlist or playback on the physical screen. YouTube video is limited to its supported 2× maximum while the surrounding preview continues at the selected speed. Video previews in the Media Library provide the same speed choices.
Publishing timing
Most changes reach a player during its normal refresh or heartbeat cycle. For urgent changes:
- Save the content or assignment.
- Confirm the admin reports that the change is saved.
- Use Force player reload on the target screen.
- Check Last Seen and the physical display.
Offline players cannot receive new cloud changes until connectivity returns, although previously cached content may continue playing.
21. Remote control
Watch the narrated Remote Control guide 1:01
The Remote page is intended for supported Android players. It is available at the /admin/remote.php admin route even though it is not part of the standard customer navigation.
Select a target
Choose the screen carefully and check its online status and screen code before sending a command.
Available commands
- Reload player
- Open admin
- Player setup
- Network
- Android settings
- Close app (Android player only)
The keyboard area can send text, Tab, Enter, Backspace, Escape, and arrow keys. Tap or focus the intended TV field first, or use Tab to move between fields.
Commands are normally collected on the next player heartbeat, so an offline player will not respond immediately. Recent Commands shows queued and recent command activity.
Use settings commands carefully. Opening Android settings can interrupt public playback until the player is restored.
Close app releases kiosk/Home ownership, leaves Android settings visible where available, and removes DisplayFlow from the current Android task. The player starts again after a device restart or when DisplayFlow is launched manually.
22. Profile, features, billing, and AI credits
Watch the narrated Profile and Security guide 0:59
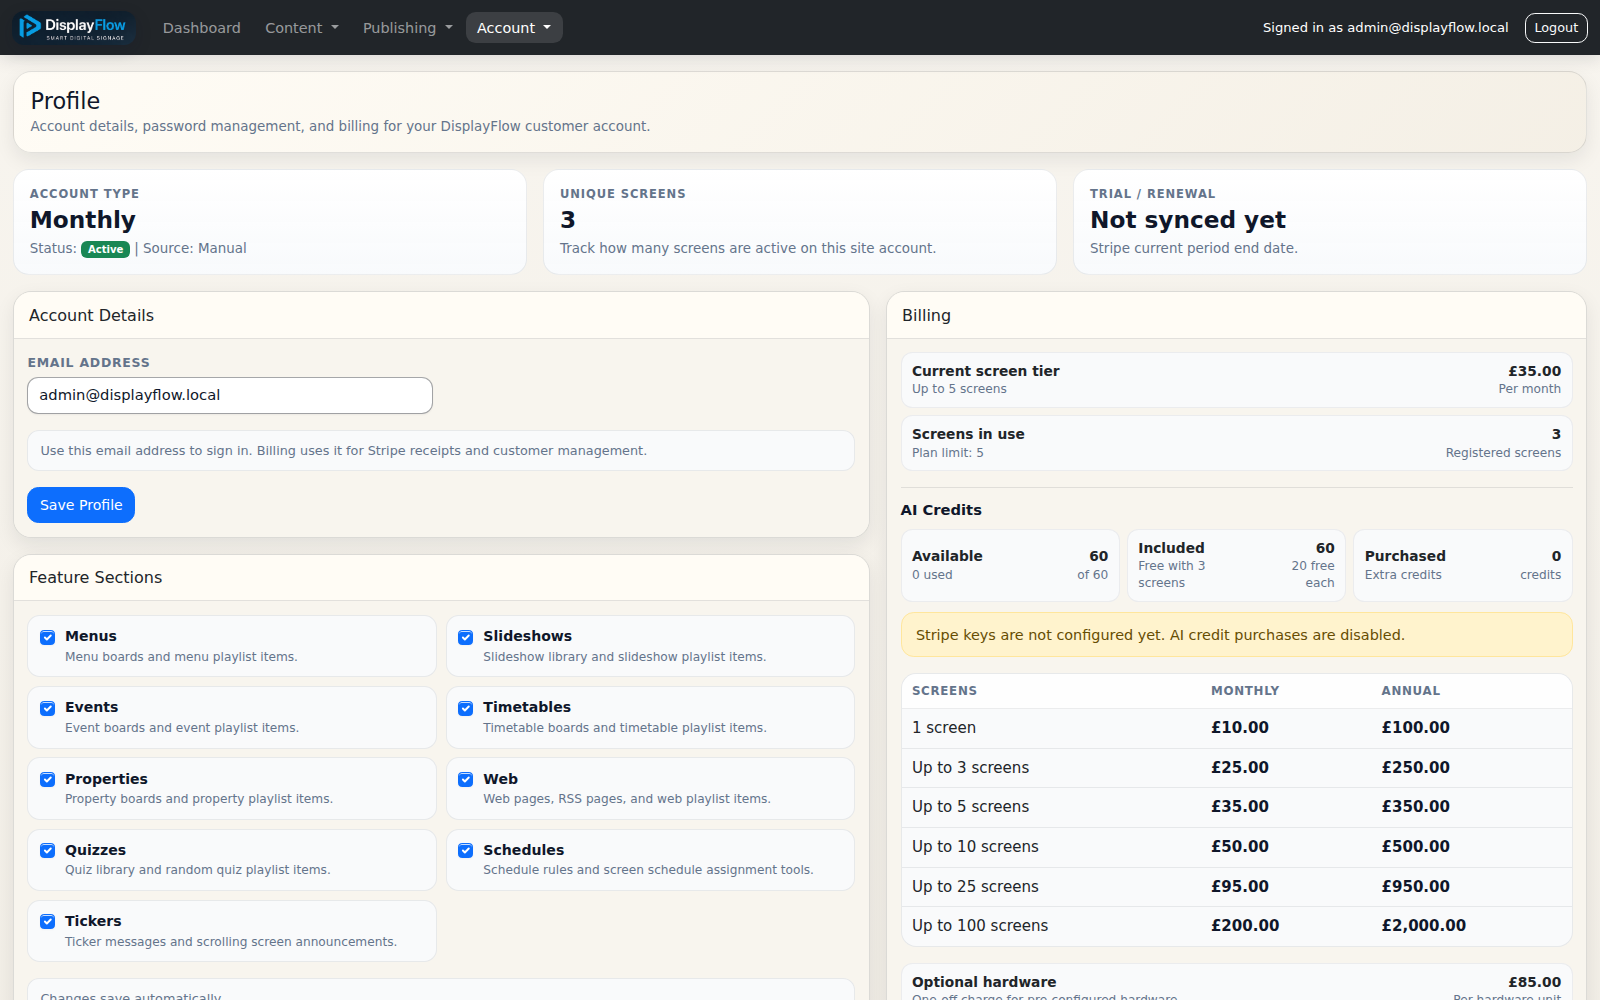
Account details
Use Profile > Account Details to update the account email address. Changing the email may require the new address to be verified before normal access continues.
Feature Sections
Enable or disable optional admin sections such as Slideshows, Menus, Events, Timetables, Property, Web, Quizzes, Schedules, and Tickers. Disabling a section hides its navigation and can exclude that content type from playback; it does not delete existing content.
Check affected playlists before disabling a feature already used on live screens.
Password and two-factor login
Manage these under the relevant Profile cards. See Signing in and account security.
Billing
The billing area shows the current account state and available subscription controls. Depending on account configuration, you can:
- choose monthly or annual billing;
- choose an eligible screen tier;
- include optional hardware quantities;
- begin checkout;
- open the billing portal to manage an existing subscription.
A lower screen tier cannot be selected when the account currently has more screens than that tier permits. Expired or invalid billing can restrict admin access and stop assigned screens from receiving normal playlist content.
AI credits
The profile displays included, purchased, used, and remaining AI media credits. Included credits are calculated from the number of screens in the account. Available controls can include:
- buying a credit pack;
- enabling automatic renewal;
- choosing the balance threshold that triggers renewal.
Review costs displayed by the live billing interface before confirming a purchase.
Delete account
The Danger Zone permanently deletes the customer account after password and typed confirmation. This is destructive and can remove customer-owned records and uploaded content. Export anything required and disconnect operational screens before using it.
23. Recommended operating practices
Name items consistently
Use names that describe location and purpose, for example:
Scunthorpe Reception - Main ScreenLunch Menu - WeekdaysGym Timetable - Studio 2Christmas Offers 2026
Use folders and groups
- Media folders organise source assets and drive slideshows.
- Screen groups organise operational displays.
Avoid creating multiple spellings for the same group.
Preview before assigning
Check content-page preview, playlist order, and screen preview. Pay special attention to portrait orientation, long text, small prices, embedded websites, and AI-generated wording.
Avoid deleting live dependencies
Deactivate content first when practical. DisplayFlow blocks many unsafe deletions, but always check playlist and screen assignments before removing anything.
Keep a fallback
For scheduled screens, configure a fallback playlist with safe evergreen content. This avoids an empty screen when no rule matches.
Monitor screen health
Review Dashboard > Needs Attention regularly and use appropriate alert levels. Investigate repeated offline/recovery cycles even if the screen is currently online.
Protect access
- Use a unique password.
- Enable two-factor login.
- Keep connection codes and player URLs private.
- Log out on shared devices.
- Release a linked device only during an intentional replacement or repair.
24. Troubleshooting
The screen is unassigned
Open Screens > Assignment and select a direct playlist or schedule. Confirm the selected playlist and required items are active.
The screen is offline
- Check power, HDMI, and the display input.
- Check the Android device's Wi-Fi or wired network.
- Check whether the venue has internet access.
- Confirm the player application is open.
- Check Last Seen in the admin.
- Once connected, request Force player reload if needed.
The screen is online but content is wrong
- Confirm the correct screen row and code.
- Check its direct playlist or schedule assignment.
- For schedules, check day, time, application timezone, priority, and fallback.
- Confirm playlist items and source content are active.
- Preview the screen.
- Force a player reload.
A schedule is not switching
Check:
- the schedule and rule are active;
- the correct days are selected;
- start and end times are correct;
- overnight timing is intentional;
- overlapping rules use the intended priorities;
- the screen is assigned to that schedule;
- a fallback playlist is configured.
A ticker is missing
Check the ticker's active state, screen assignments, date range, days, daily times, priority, and text/background contrast. Confirm the screen's ticker summary reflects the assignment.
Media cannot be deleted
The item is still referenced. Remove it from playlists, menus, events, properties, or other listed dependencies, then try again.
Media shows “missing file”
Use Update Media to upload a replacement. Do not rely on the item until its preview works.
A web page does not display
The remote site may block embedding, require authentication, use unsupported browser features, or reject the player's network. Test its preview and use an uploaded image/video alternative when embedding is not permitted.
RSS headlines do not load
Verify the feed URL opens publicly and returns a valid RSS/Atom feed. The remote server may be unavailable or may have changed its format.
An Android player will not pair
- Confirm the code is copied from the intended screen.
- Confirm the screen is active.
- If it reports an existing device link, use Release linked device.
- Check Android network access.
- Re-enter the code and save setup again.
Remote commands do not arrive
Check that the target screen is online and that the Android player is running. Commands wait for the next heartbeat and cannot reach an offline device.
Login or email code problems
Check the email address and spam folder, then retry after allowing time for delivery. Use password reset if the password is uncertain. Contact DisplayFlow support if verification, reset, or two-factor messages consistently fail.
Billing restricts the account
Open Profile > Billing and review the displayed status, screen tier, and portal/checkout options. If the account has more screens than the selected tier permits, remove unused screens or choose a sufficient tier.
25. Platform operator appendix
This section applies only to authorised DisplayFlow master operators. Customer administrators do not see these tools.
Clients
The Clients page is the starting point for selecting a customer context. After selecting a client, the normal admin pages operate inside that customer's account. Always check the selected-client banner before making a change.
Use Switch Client to leave the current customer context and choose another account.
Use Email Clients to send a separate plain-text message to one, several, or all customer accounts. Choose a welcome, getting-started, or help template to fill the subject and message, review and edit the text, then send it. The welcome template includes sign-in, user-guide, and support links. Recipient addresses are not shared between customers.
All Screens
Without a selected client, All Screens provides a read-only cross-account view. It can filter active/inactive and online/offline screens for support triage without changing customer settings.
AI Usage
AI Usage provides cross-client AI credit and usage reporting. Filter to a client when investigating consumption, but use the customer's Profile controls for customer-scoped settings.
Customer account changes
When working in a selected customer context:
- confirm the account email and client banner;
- avoid changing content or screen assignments without an authorised request;
- document destructive or billing-related changes;
- use the customer's Preview and screen-health evidence to verify the result;
- switch out of the client context immediately after finishing.
Quick reference
| Goal | Admin area |
|---|---|
| Upload an image or video | Media |
| Build a folder-based image rotation | Media, then Slideshows |
| Build a menu | Menus |
| Publish an event list | Events |
| Build a class/room schedule | Timetables |
| Publish a property listing | Property |
| Show a website or RSS feed | Web |
| Add quiz content | Quizzes |
| Add clocks, countdowns or weather | Special |
| Send temporary full-screen messages | Override Setup, then Screen Override |
| Decide playback order | Playlists |
| Switch playlists by time | Schedules |
| Add a scrolling message | Tickers |
| Create, connect, or monitor a display | Screens |
| Send Android player commands | Remote |
| Manage advertiser records and upload links | Advertisers |
| Manage security, features, billing, or AI credits | Profile |
26. Special
Use Content > Special to create clocks, world clocks, countdowns and weather pages for your playlists.
Create a Special page
- Open Special and choose Add Special.
- Choose Clock, World Clocks, Countdown or Weather, then enter a name that you will recognise in the playlist picker.
- Choose the layout and colours, and complete the options for your page type below. Check the live preview.
- Keep Active and available for playlists enabled. Options save automatically once the required fields are complete; wait for All options saved. before closing. Resolve any save error before continuing.
- Open Playlists, edit the target playlist and choose Add Item. Select the saved page under Specials, set its display duration and add it to the running order.
- Preview the target screen, then check the connected browser or Android display after it receives the update.
Choose the page type
- Clock: select a timezone, layout and clock face. Choose 12- or 24-hour time and whether to show the date and seconds.
- World Clocks: add up to eight named locations with their own timezones. Choose a layout and digital, analogue or combined analogue/digital clocks; set the time format and date visibility.
- Countdown: enter a heading, timezone, target date and time, and a message to show when the countdown completes. Each time the playlist shows this page, it displays the time remaining until the same target date and time.
- Weather: enter a location, search and select a result so its coordinates are saved. Choose Celsius or Fahrenheit, current conditions or a forecast layout, and one to five forecast days. The editor uses sample weather; check screen preview or the player for actual conditions.
Clock and countdown accuracy depends on the player device having the correct time. Weather needs connectivity to refresh; a previously received forecast may appear as Last available forecast, or the screen may report that weather is temporarily unavailable.
Edit or remove a Special page
Use the pencil button in Special to edit a saved page. Changes update playlists that use it when their players refresh. A saved page keeps its type; create another page to use a different type. If a page is missing from Add Item, check that it is active. Remove a page from its playlists before deleting it.
27. Screen Override
Use Publishing > Override Setup to prepare reusable message settings, then Publishing > Screen Override to send a temporary full-screen message to one screen. Examples include an order number with “Order ready” above it, or a patient call with a room on the third line.
Prepare an override setting
- Open Override Setup and choose Add Override.
- Enter a Setting name, choose the destination Screen, and enter the fixed Top line.
- Optionally enter Third-line choices, one per line, such as Room 1 and Room 2. Leave these empty for a two-line order-number message.
- Choose the background and each text line’s colour, and check the sample preview.
- Set the display duration from 3 to 300 seconds and the start-within expiry from 1 to 60 minutes (default 10 minutes). Expiry is the deadline to start the message, separate from how long it stays on screen.
- Optionally enable Play a chime when each message starts, keep the setting active and save it.
Use the pencil button to edit or deactivate a setting. Changes apply to future sends; messages already queued retain the original text, screen, colours, chime and timing.
Send and track a message
- Open Screen Override and select a setting.
- Enter the main message on the second line and optionally select a third line.
- Check the preview and named destination screen, then press Send.
- Use Refresh status under Queue and recent messages to see progress. Resend queues a fresh copy of the original message for the same screen, with a fresh expiry.
Messages play in the order sent, sharing one queue per screen across all settings. Each message temporarily replaces normal content and hides tickers and overlays. Normal playback restarts after the queue finishes; the interrupted item normally starts again from its beginning.
Online players check for messages every 30 seconds once they have detected an active setting. The first detection can take the player’s previously configured heartbeat interval. Delivery also depends on connectivity and messages already in the queue, so sending is not instantaneous. An offline screen cannot receive new messages until it reconnects, and messages that miss their start deadline expire.
- Queued: saved and waiting for the player to report a start or completion.
- Displaying: the player reported starting the message.
- Completed: the player reported finishing its display duration; check the physical screen when confirmation matters.
- Expired: the start deadline passed without an acknowledged start, or a displaying message stopped reporting for too long.
Status can lag playback by a heartbeat, and short messages can go straight from Queued to Completed. History times are UTC. A player reload before acknowledgement can replay an unexpired message. Screen previews do not receive or consume live override messages.
Let staff send from a phone
Open Staff message page from Override Setup, or visit the staff sending page. Staff sign in using the account email address and the destination screen’s six-character code. They can select that screen’s active settings, preview, send, refresh history and resend messages. Administrators control setup, colours and durations.
Share these details only with authorised staff: anyone with the pair can send messages to that screen and see its recent history. These shared details do not identify individual staff members. Sign out after using a shared device.
Check delivery and sound
If nothing appears, check that the setting and destination screen are active, the screen is online and account access is current. Refresh history and check for queued or expired messages. Existing players may need a reload after a player software update. Verify delivery on the actual browser or Android screen.
For the optional chime, check that the screen has working speakers and its volume is unmuted. A standard browser may need a click or key press on the player before it allows sound. Audio restrictions do not prevent the visual message from displaying.